Sunday, October 18, 2020

Remove ALL docker containers and images

- remove all docker containers

# docker stop $(docker ps -a -q) 

# docker rm $(docker ps -a -q) 

- remove all docker images
# docker rmi $(docker images -q)

Wednesday, December 12, 2018

Lightning of Thunderbird not compatible on Ubuntu

Install a package of xul-ext-lightning. # sudo apt-get install xul-ext-lightning restart the thunderbird.

To Solve The Problem of "changed its 'Origin' value from 'Google, Inc.' to 'Google LLC'

It's EASY. # sudo apt update

Sunday, July 24, 2016

Eclipse에 Gradle과 Spring 4 Framework 환경 구성

이클립스 버전은 Mars.2 Release (4.5.2)

1. Spring Boot를 사용하기 위해서는 Spring Tool Suite (STS) for Eclipse 3.8.0 RELEASE를 설치

설치는 이클립스의 마켓플레이스 혹은

업데이트 사이트 https://spring.io/tools/sts/all 를 이용한다.

STS를 설치하고 나면 아래와 관련된 메시지를 볼 수 있다.

"Migration guide from STS Gradle to Buildship"
https://github.com/eclipse/buildship/wiki/Migration-guide-from-STS-Gradle-to-Buildship

말그대로 Buildship 환경으로 옮기는 것이 좋다는 이야기다.


설치가 완료된 후에 메뉴를 통해 Spring Starter Project를 선택하면 프로젝트가 생성되는데, 이때 이용하는 스프링 프레임워크 버전이 4.2.7이다


2. Gradle Plugin을 이클립스에 설치하기 위해 Buildship Gradle Integration 1.0을 설치

1) Buildship Gradle Integration 1.0을 설치
https://gradle.org/press-release/eclipse-gradle/

이클립스 마켓플레이스를 통해 Buildship Gradle Integration 1.0을 설치

참고 사이트
http://stunstun.tistory.com/245
https://docs.gradle.org/current/userguide/eclipse_plugin.html


Friday, July 8, 2016

Gradle로 이클립스에 Spring 환경 구축하기 - 초보자용

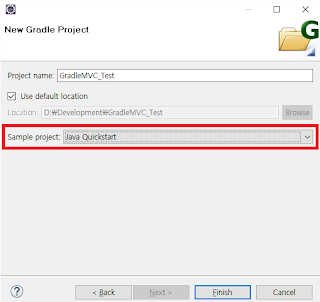
1. 이클립스를 통해 Gradle 프로젝트를 생성


2. build.gradle 파일을 수정

apply plugin: 'java'
apply plugin: 'eclipse-wtp'
apply plugin: 'war'

sourceCompatibility = 1.8
targetCompatibility = 1.8

version = '1.0'
jar {
    manifest {
        attributes 'Implementation-Title': 'Gradle Quickstart',
                   'Implementation-Version': version
    }
}

repositories {
    mavenCentral()
}

def version = [
spring: '4.3.1.RELEASE'
]

dependencies {
    compile group: 'commons-collections', name: 'commons-collections', version: '3.2'
    compile "org.springframework:spring-context:${version.spring}"
    testCompile group: 'junit', name: 'junit', version: '4.+'
}

[compileJava, compileTestJava]*.options*.encoding = 'UTF-8'

test {
    systemProperties 'property': 'value'
}

uploadArchives {
    repositories {
       flatDir {
           dirs 'repos'
       }
    }
}


3. Run As > Gradle Build... 를 선택하고 아래와 같이 입력한다


4. 아래와 같이 스프링 라이브러리가 로딩되어 있음을 볼 수 있다.


참고 사이트
http://goo.gl/X5xVzr
http://goo.gl/g9egF6
http://stag.tistory.com/21

Sunday, May 22, 2016

Setting up Spring Development Environment for Mac

1. Install Eclipse Java EE Mars.2 Release (4.5.2)

2. Install Spring IDE on Eclipse
help > Eclipse Marketplace
search Spring and install Spring Tool Suite (STS) for Eclipse 3.7.3

or

Download at https://spring.io/tools/sts/all and Install

3. Install Tomcat

http://tomcat.apache.org/

download Tomcat 8.0.35 and extract it.

In order to configure, open the menu of Preference > Server > Runtime Environment.

Add Tomcat 8 Server.

4. Open Window > Show View > Servers

Add the Tomcat Server for a project.